Showing posts with label Skinning. Show all posts

Wednesday, 2 June 2021

Major - Submission Post

The Misadventures of Klepto-Man! - Submission Version


Klepto-Man Lighting & Rendering PDF


Making of Klepto-Man


Demo Reels (Character Turnarounds)


The Misadventures of Klepto-Man! - Written Summary

The Misadventures of Klepto-Man is a short with a simple premise, a superhero stops a bank heist, but ends up stealing from the bank himself. The short is heavily inspired by older animations, such as UPA, Looney Tunes, and most importantly, Roger Ramjet, being the main inspiration for the character's design and the general plot structure. 

While the original overall goal of the project was to create a 4 minute animated short, due to multiple circumstances affecting my work flow, the full animation is unfinished, with only only the opening 46 seconds finished. However I still believe much of the goal was met: five original characters have been modeled, skinned, rigged and animated; I have also managed to create a 2D looking artstyle within maya, which was part of the original goal.


Premise Submission: https://tdbucaanimation.blogspot.com/2020/05/premise-final-submission.html

Minor Submission: https://tdbucaanimation.blogspot.com/2021/01/minor-submission-post.html

Thursday, 30 July 2020

Toolkit 2 - Resubmission

Pipeline 1


Head Modelling


Parts 4, 5 & 6: https://tdbucaanimation.blogspot.com/2020/06/pipeline-1-head-modelling-parts-4-5-6.html

Parts 7 & 8: https://tdbucaanimation.blogspot.com/2020/06/pipeline-1-head-modelling-parts-7-8.html

Parts 9, 10 & 11: https://tdbucaanimation.blogspot.com/2020/06/pipeline-1-head-modelling-parts-9-10-11.html

Parts 12, 13 & 14: https://tdbucaanimation.blogspot.com/2020/06/pipeline-1-head-modelling-parts-12-13-14.html

Body Modelling


Parts 1 & 2: https://tdbucaanimation.blogspot.com/2020/06/pipeline-1-body-modelling-parts-1-2.html

Parts 3 & 4: https://tdbucaanimation.blogspot.com/2020/06/pipeline-1-body-modelling-parts-3-4.html

Parts 5 & 6: https://tdbucaanimation.blogspot.com/2020/06/pipeline-1-body-modelling-parts-5-6.html

UV Layouts


Parts 1 & 2: https://tdbucaanimation.blogspot.com/2020/06/pipeline-1-uv-layouts.html

Skinning


Parts 1 & 2: https://tdbucaanimation.blogspot.com/2020/06/pipeline-1-skinning-parts-1-2.html

Parts 3, 4 & 5: https://tdbucaanimation.blogspot.com/2020/07/pipeline-1-skinning-parts-3-4-5.html

Parts 6 & 7: https://tdbucaanimation.blogspot.com/2020/07/pipeline-1-skinning-parts-6-7.html

Rigging


Parts 1 & 2: https://tdbucaanimation.blogspot.com/2020/07/pipeline-1-rigging-parts-1-2.html

Parts 3 & 4: https://tdbucaanimation.blogspot.com/2020/07/pipeline-1-rigging-parts-3-4.html

Facial Rigging


Parts 1 & 2: https://tdbucaanimation.blogspot.com/2020/07/pipeline-1-facial-rigging-parts-1-2.html

Parts 3, 4 & 5: https://tdbucaanimation.blogspot.com/2020/07/pipeline-1-facial-rigging-parts-3-4-5.html

Parts 6, 7 & 8: https://tdbucaanimation.blogspot.com/2020/07/pipeline-1-facial-rigging-parts-6-7-8.html

Parts 9 & 10: https://tdbucaanimation.blogspot.com/2020/07/pipeline-1-facial-rigging-parts-9-10.html

Parts 11, 12 & 13: https://tdbucaanimation.blogspot.com/2020/07/pipeline-1-facial-rigging-parts-11-12-13.html

Texturing


Parts 1, 2 & 3: https://tdbucaanimation.blogspot.com/2020/07/pipeline-1-texturing-parts-1-2-3.html


Mudbox


Parts 6, 7 & 8: https://tdbucaanimation.blogspot.com/2020/06/toolkit-2-mudbox-tutorials-chapters-6.html

Parts 9 & 10: https://tdbucaanimation.blogspot.com/2020/06/toolkit-2-mudbox-chapters-9-and-10.html

Parts 11, 12 & 13: https://tdbucaanimation.blogspot.com/2020/06/toolkit-2-mudbox-tutorials-chapters-11.html

Own Model: https://tdbucaanimation.blogspot.com/2020/06/toolkit-2-mudbox-own-modelling.html


Original Toolkit 2 Submission


https://tdbucaanimation.blogspot.com/2020/05/toolkit-2-final-submission.html

Sunday, 26 July 2020

Pipeline 1 - Facial Rigging: Parts 11, 12 & 13

Part 11 - Adding a Blink


Duplicated another head as well as the corneas.

Using the corneas display handle, created new joints to make the bink movement

Skin weighted, blend shapes created, control added to the main rig


Part 12 - Brow Movement


Once again duplicated the head, this time with the eyebrows, strap and skull cap

Wrapped the geometry together and added two joints to skin with

Created "eyebrow down" position

Created "eyebrow up" position

Sorted skinning to only work on the left

Created "Angry" and "Surprised" positions

Removed original up and down positions, created flipped blend shapes for the right side

Worked in eyebrow control and now the eyebrow blend shape works with the main rig


Part 13 - Cleaning Up the Scene


Scene cleaned and ready to move onto texturing


Full body and facial rigs complete

Friday, 24 July 2020

Pipeline 1 - Facial Rigging: Parts 9 & 10

Part 9 - Cheek Thinning

Duplicated head, twice with mouth open

Cheeks thinned

Thinned cheeks on the complete model


Part 10 - Adding Extra Face Movement

New duplicate head
Created joints for cheeks, nose and chin

Skinned and weighted
Controls added and modelled

Controls brought down to main model and connected in

Thursday, 23 July 2020

Pipeline 1 - Facial Rigging: Parts 6, 7 & 8

Part 6 - Adding Teeth & Tongue


Imported basic teeth, tongue and gums

Modified to fit mouth

Teeth and gums connected in, tongue rigged and then also connected in


Parts 7 & 8 - Lateral Mouth Movement Parts 1 & 2


Duplicated head again and moved up

Duplicated left corner joint and attached it to the new duplicated head

Added base joint, animated wide mouth and weighted

Duplicated out movement

Created in movement and duplicated

Created up movement and duplicated

Created down movement and duplicated

Added neutral position
Created temporary inbetweens

Created proper corrective blend shapes

Created blend shapes and connected them to the bridge head

Moved the controls down to the main rig

Connected and modeled the controls
Mouth has now been fully rigged

Sunday, 12 July 2020

Pipeline 1 - Facial Rigging: Parts 1 & 2

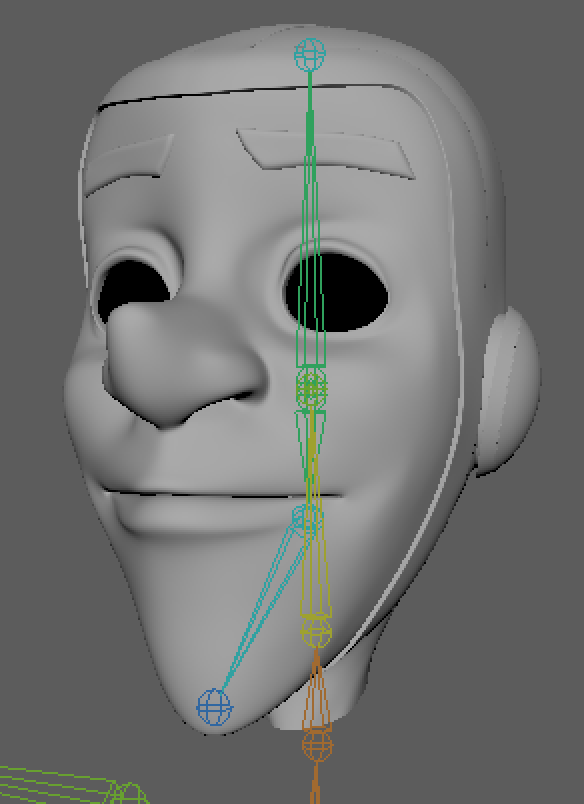
Part 1 - Creating a Head Skeleton & Binding


Added joints

Skinned mouth

Skinned neck

Skinned upper head to create squash & stretch

Fully skinned head


Part 2 - Creating Head Controls & An Eye Look Rig


Added jaw control

Added neck controls

Added upper and lower head controls

Added eye follow control

Added face camera

Added face controls visibility control

Saturday, 4 July 2020

Pipeline 1 - Skinning: Parts 6 & 7

Part 6 - Adding Pose Space Deformers (Corrective Blend Shapes) Upper Body


For some reason I cannot get blend shapes to work correctly with the shoulder, because of this instead of taking screenshots, I will be taking notes to follow later.

To start creating blend shapes animate the appropriate joint, in this case the shoulder.
Animate:

  • Neutral Frame (Frame 1)
    • Swing up (Frame 10)
  • Neutral Frame (Frame 20)
    • Swing down (Frame 30)
  • Neutral Frame (Frame 40)
    • Swing back (Frame 50)
  • Neutral Frame (Frame 60)
    • Swing forward (Frame 70)
  • Neutral Frame (Frame 80)
    • Twist forward (Frame 90)
  • Neutral Frame (Frame 100)
    • Twist back (Frame 110)
  • Neutral Frame (Frame 120)


With the animation, you will notice clipping and other abnormalities with the model, this is fixed with blend shapes.

To create a blend shape:

  • Rigging Menu
    • Deform
      • Pose Space Deformation
        • Pose Editor


This is the advanced mode of the Pose Editor, useful for checking that you are using the correct Twist Axis.

Creating Blend Shapes:

  1. While the shoulder joint is selected and you are on frame one, press the "Create Pose Interpolator" button.
    • This will create a neutral pose based on your model. (Specifically three neutral poses. A neutral swing & twist, a neutral swing and a neutral twist.)
  2. Move to frame 10, which should be the up pose.
  3. With the joint selected, press the "Add Pose" button.
    • This will create a blend shape.
  4. Now modify the geometry in the general area to correct any issues such as loss of volume, collapsing, clipping, etc.
    • Remember to be careful when editing to not create something that looks unnatural or to make something (like the shoulder) too large.
  5. Once you have finished editing the pose into something that works, scroll over to the next movement key-frame (In this case, frame 30 for the swing down) and press "Add Pose".
  6. Once you have done that, begin editing the geometry.
  7. Repeat this process for all swing poses.
  8. When you start on the on the twist poses, be sure to set them to twist instead of swing in the Pose Editor
  9. Then continue the fixing process for the twist poses.
  10. Once you have finished with the twist here. Save and delete the animation.
Moving onto the elbow.

Added elbow blend shape

Annoyingly, the issue I've been having cropped back up when working on the wrist, so I haven’t finished that joint either, however I will still explain the process.


  1. Since the issue with the wrist is that it keeps losing its size, firstly create 6 locators around it.
  2. Animate the wrist swinging up, down, left and right.
  3. The process of creating blend shapes is exactly the same as with the shoulder.

Locators surrounding the wrist.
I've noticed that my problem only occurs after 2 poses have been added. I have no idea if this information is helpful, but it's an observation.

Also I noticed that my mirroring went slightly wrong, I don't know if that's related to the same issue, or if I accidentally missed something.

Part 7 - Adding Pose Space Deformers (Corrective Blend Shapes) Lower Body


Once again, I'm having issues, so I'm just going to continue writing notes.


  • Renamed "L_Leg_jnt" to "L_Hip_jnt" (Same for the right side)
  • Animate hip
    • Slightly out to the side
    • Backwards
    • Forwards
    • Very slightly inwards
  • Animate Knee
    • Backwards
  • Create Pose Interpolator for the Hip from the Pose Editor
    • Be sure to be in a neutral pose
  • Create pose for the first movement
  • Make necessary adjustments
    • Ensure that the adjustments made are not destructive and always compare with both the opposite side of the model and with normal human anatomy for reference
  • Once complete, create a pose for the next shape
  • Continue this process until all necessary blend shapes have been created and all errors have been corrected
  • And repeat the process for the knee
  • Once all blend shapes are created, mirror them across from the Pose Editor
    • Double check that everything is working as intended
Knee blend shape


Skinning Complete (Mostly)

Wednesday, 1 July 2020

Pipeline 1 - Skinning: Parts 3, 4 & 5

Part 3 - Binding & Weight Grouping the Mesh


Bound boots.

Bound legs.

Bound hand.

Bound torso.

Fully bound Jet Pack Jones, awaiting blending. (Head has temporary weights)


Part 4 - Blending the Upper Body


Blended hand

Blended wrist

Blended elbow

Blended shoulder

Blended neck

Blended spine


Part 5 - Blending the Lower Body


Blended foot ball

Blending ankle

Blended ankle & shin twist

Blended knee

Blended hip

Weights mirrored, awaiting blend shapes

Major - Reflective Statement

I won't lie, if I really wanted to I could make this reflective statement just be a list of every little detail that went wrong from pre...